Today was a great day at school. We did a ton of Spring cleaning, possibly inspired by the new "floral" air freshener I picked up off one of those cute displays at Walmart. So, to keep up the spirit, I created a giant tissue paper flower. The inspiration came from Martha Stewart here. Although I tweaked it a bit to make a more "flat" flower.
Steps:
1. Fan fold two sheets of tissue paper together. Back and forth, back and forth. (And I actually used 3 sheets on the largest flower)
2. tie the center. I used sewing floss, Martha used wire. Whatev.
3. Round the edges.
4. Fan it around until it makes a circle and tape. I used double sided because it's the best.
*Repeat two more times making each flower shorter.
5. Sew the three flower layers together. I used floss once again and sewed through one at a time then back up through all of them then back down.
6. Attach string to hang in between the second and third layer. I just kinda wrapped it around.
Tada!
Happy Spring wishing :)
background
Tuesday, February 28, 2012
Monday, February 27, 2012
Skittle Math!!
To introduce graphing, we did a little skittle math! I downloaded the printables from Erica Bohrer here :) They each received half a dixie cup of skittles, then sorted them by color. After sorting they created a bar graph and used the graph to solve some problems. (Ex: how many purple and green skittles did you have _____+_____=_____)Then we made a whole class graph!
 |
| Sorting the candy first on mats |
 |
| Graphing his skittles! |
Saturday, February 18, 2012
Crafternoon Binder Makeover!
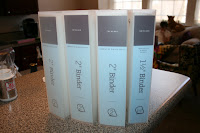
To add some fun and color to my teaching resources, I gave my binders a makeover!
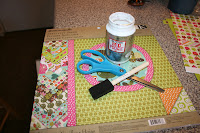
You will need thick scrapbook paper, scissors, Mod Podge, water, a foam brush and a pencil.
Oh, and binders :)
I decided to use several different sizes. They are made of a rough plastic. I think I picked these up at Office Depot.
 First, cut paper to go on the covers and spine. I used a pencil to trace.

Next, get your foam brush damp, dip in the Mod Podge and apply a medium thick coat to the surface of the binder.

Then, paint the back of the scrapbook paper with the Mod Podge and stick it down to the binder. Make sure to line it up well and rub out all the bubbles!
 *Wait 15 minutes, then apply a thin coat of
Mod Podge over all the paper to seal it in!
Oh, and binders :)
I decided to use several different sizes. They are made of a rough plastic. I think I picked these up at Office Depot.
 First, cut paper to go on the covers and spine. I used a pencil to trace.
Next, get your foam brush damp, dip in the Mod Podge and apply a medium thick coat to the surface of the binder.

Then, paint the back of the scrapbook paper with the Mod Podge and stick it down to the binder. Make sure to line it up well and rub out all the bubbles!
 *Wait 15 minutes, then apply a thin coat of
 Mod Podge over all the paper to seal it in!
Saturday, February 4, 2012
Spread Some (Book) Love
For Valentine's Day, I am making little felt bookmarks for each of my kiddos!
 First I made two patterns. One for the bookmark and one for the embellishment heart. I cut these out of cardstock. The bookmark is two hearts attached because you will fold it.
 Last, I folded the bookmark and sewed it together using the remaining 4 strands of floss at about a yard. This is a little tricky. You have to go through both layers at the bottom "V" but only the top layers on the bumps of the heart.
All you need is:
Felt
Floss
Embroidery Needle
Scissors
Heart Pattern
 First I made two patterns. One for the bookmark and one for the embellishment heart. I cut these out of cardstock. The bookmark is two hearts attached because you will fold it.
I then pinned them to the felt and carefully cut around the pattern. (you could trace with a marker then cut if you wish)
Next, I sewed the small hear to the left side of the bookmark with floss. I used two strands at about a yard length.
 Last, I folded the bookmark and sewed it together using the remaining 4 strands of floss at about a yard. This is a little tricky. You have to go through both layers at the bottom "V" but only the top layers on the bumps of the heart.
Ta-da! A perfect reminder that reading is lovely!
 |
| And then I got bored and made this owl! |
Subscribe to:
Comments (Atom)


