This year a big push in the upper grades was daily guided reading time. In third grade we share our kids across the grade level, making sure to meet with each student every day! This was very challenging to begin with, so we worked through it as a team, and now it seems to be running smoothly! One great resource I use is a daily guided reading form that makes planing and recording anecdotals about the kids so much easier! So I have put my daily form up on TpT! Check it out!
http://www.teacherspayteachers.com/Product/Guided-Reading-Form-and-Anecdotal-Records
background
Tuesday, April 10, 2012
Saturday, March 3, 2012
Aim for the Moon! My first TPT item!
Today I dove into our next unit for science: The Universe. One key thing they are going to explore is the the Moon. So, I created a fun moon journal for my students to use to observe the phases of the moon. It turned out pretty neat so I decided I would put it on TPT. This is a pretty big deal for me, haha. So, here it is! (And by the way, the download is completely FREE!)
Spelling + Wordle
To make spelling word practice a little more fun, I created a Wordle here.

To create your own, type your list in like this and hit go!
Spelling~Test~Friday
Spelling~Test~Friday
once
let
there
food
country
know
mother
next
father
while
their
something
too
write
light
place
together
To create your own, type your list in like this and hit go!
Spelling~Test~Friday
Spelling~Test~Friday
once
let
there
food
country
know
mother
next
father
while
their
something
too
write
light
place
together
Friday, March 2, 2012
Crafting Writers
Wow, what a week! I feel like the to-do list keeps getting longer, and the kids are starting to feel the increase in the work load too. We had a nice relaxed day today, with some fun graphing, Scholastic News, our new BFFs Henry, Jessie, Violet and Benny, and WRITING!
So, as a first year teacher I try to be as "reflective" as possible. The third quarter is coming to a close so I have begun to reflect, reflect, reflect. I finally feel comfortable with our guided reading groups, math, science, and reading, BUT there's this one subject I just cannot wrap my head around--Writing. I suppose some of this is due to the fact that most my background is in early, early childhood where marks on paper, correct letter formation, and maybe even writing your own name was about the extent of the writing I "taught." So it is time for some personal professional development. Luckily our professional library is awesome. After browsing some, I picked up this! :)
I did my "picture walk" and read the intro and already can tell this is going to be so useful! Today I tried one suggestion--give the students "writing spots." HOLY COW! 20 blissful (and silent) minutes of engaged writers! I think the best thing I did was to call my teacher desk "The Office" and use it as the most desired writing spot. "Whoever is doing the very best job writing today will get to move to 'The Office'." *Insert Hallelujah Chorus here*
Will follow up with a full book review!
<3
So, as a first year teacher I try to be as "reflective" as possible. The third quarter is coming to a close so I have begun to reflect, reflect, reflect. I finally feel comfortable with our guided reading groups, math, science, and reading, BUT there's this one subject I just cannot wrap my head around--Writing. I suppose some of this is due to the fact that most my background is in early, early childhood where marks on paper, correct letter formation, and maybe even writing your own name was about the extent of the writing I "taught." So it is time for some personal professional development. Luckily our professional library is awesome. After browsing some, I picked up this! :)
Will follow up with a full book review!
<3
Tuesday, February 28, 2012
Wishing for Spring
Today was a great day at school. We did a ton of Spring cleaning, possibly inspired by the new "floral" air freshener I picked up off one of those cute displays at Walmart. So, to keep up the spirit, I created a giant tissue paper flower. The inspiration came from Martha Stewart here. Although I tweaked it a bit to make a more "flat" flower.
Steps:
1. Fan fold two sheets of tissue paper together. Back and forth, back and forth. (And I actually used 3 sheets on the largest flower)
2. tie the center. I used sewing floss, Martha used wire. Whatev.
3. Round the edges.
4. Fan it around until it makes a circle and tape. I used double sided because it's the best.
*Repeat two more times making each flower shorter.
5. Sew the three flower layers together. I used floss once again and sewed through one at a time then back up through all of them then back down.
6. Attach string to hang in between the second and third layer. I just kinda wrapped it around.
Tada!
Happy Spring wishing :)
Monday, February 27, 2012
Skittle Math!!
To introduce graphing, we did a little skittle math! I downloaded the printables from Erica Bohrer here :) They each received half a dixie cup of skittles, then sorted them by color. After sorting they created a bar graph and used the graph to solve some problems. (Ex: how many purple and green skittles did you have _____+_____=_____)Then we made a whole class graph!
 |
| Sorting the candy first on mats |
 |
| Graphing his skittles! |
Saturday, February 18, 2012
Crafternoon Binder Makeover!
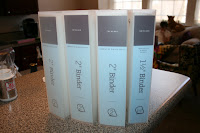
To add some fun and color to my teaching resources, I gave my binders a makeover!
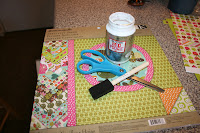
You will need thick scrapbook paper, scissors, Mod Podge, water, a foam brush and a pencil.
Oh, and binders :)
I decided to use several different sizes. They are made of a rough plastic. I think I picked these up at Office Depot.
 First, cut paper to go on the covers and spine. I used a pencil to trace.

Next, get your foam brush damp, dip in the Mod Podge and apply a medium thick coat to the surface of the binder.

Then, paint the back of the scrapbook paper with the Mod Podge and stick it down to the binder. Make sure to line it up well and rub out all the bubbles!
 *Wait 15 minutes, then apply a thin coat of
Mod Podge over all the paper to seal it in!
Oh, and binders :)
I decided to use several different sizes. They are made of a rough plastic. I think I picked these up at Office Depot.
 First, cut paper to go on the covers and spine. I used a pencil to trace.
Next, get your foam brush damp, dip in the Mod Podge and apply a medium thick coat to the surface of the binder.

Then, paint the back of the scrapbook paper with the Mod Podge and stick it down to the binder. Make sure to line it up well and rub out all the bubbles!
 *Wait 15 minutes, then apply a thin coat of
 Mod Podge over all the paper to seal it in!
Subscribe to:
Comments (Atom)


